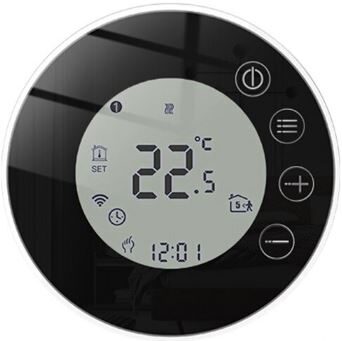
EARU WIFI-X7GA-B OVERVIEW
The EARU WIFI-X7GA-B smart WiFi thermostat offers remote temperature management for your home via a mobile application. It’s compatible with various electric heating systems, including convectors, radiant ceiling heaters, and baseboards. A standout feature is its WiFi connectivity, allowing temperature adjustments from any location with internet access. Users can create heating schedules and modify settings through their smartphones or tablets. The device boasts a user-friendly touch-sensitive interface with a large, clear digital display. Advanced functionalities include adaptive temperature control, which learns and adjusts to your heating preferences, and a vacation mode for energy conservation during absences. In essence, the EARU WIFI-X7GA-B is a versatile and efficient electric WiFi thermostat designed to optimize energy usage and maintain ideal home comfort level
Technical Details
- Category: WiFi-Enabled Temperature Control Thermostat
- Construction: Fire-resistant PC, Operating at AC 220V, 50/60Hz
- Maximum Load: 16A/3A/3A, Temperature Precision: 1°C
- Operational Temperature Span: 5°C to 95°C
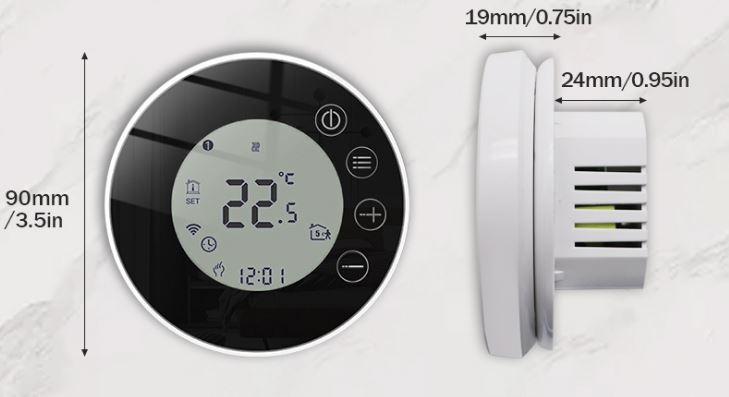
- Product Dimensions: 90 x 90 mm/3.5 x 3.5 in
Operating Instructions
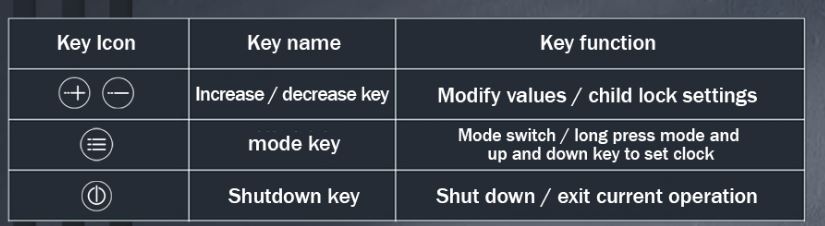
- Activate or deactivate the device using the button.
- Toggle between automatic and manual modes with the button.
- In auto mode, pressing “+” or “-” will switch to manual mode.
- Initiate timer settings by long-pressing the “and”+” buttons. Use the “button to cycle through options and “+” or “-” to adjust values.
- Engage or disengage child lock by simultaneously holding “+” and “-” buttons.
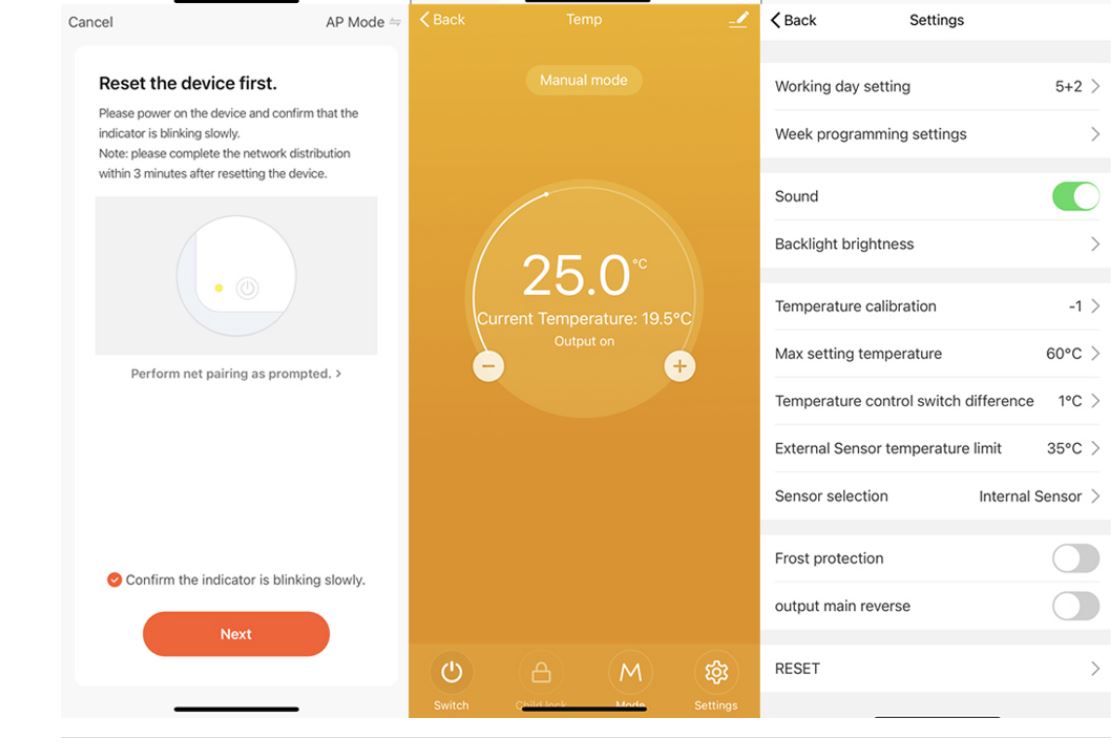
- To establish WiFi connection, hold the “+” button for five seconds after powering on the device.
Features
- Memory Retention Preserves all settings after power interruptions, eliminating the need for reconfiguration upon power restoration.
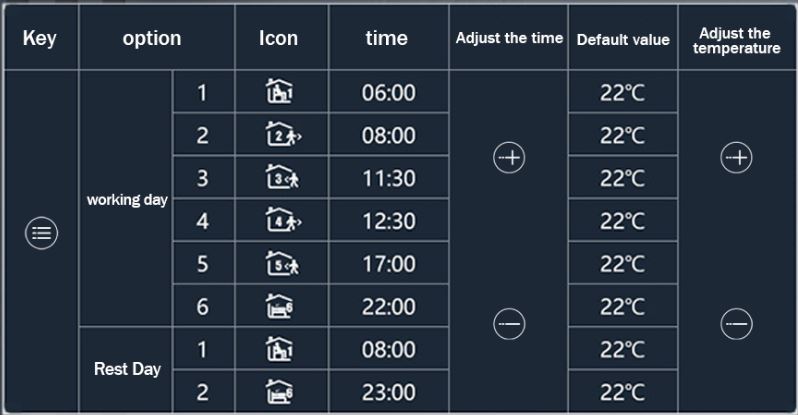
- Programmable Schedules Supports 5+2, 6+1, or 7-day weekly temperature programming with six customizable time intervals.
- WiFi and mobile app integration for remote control via smartphone.
- Single app can manage multiple devices or a single unit. Compatible with voice control systems like Google Home and Amazon Alexa.
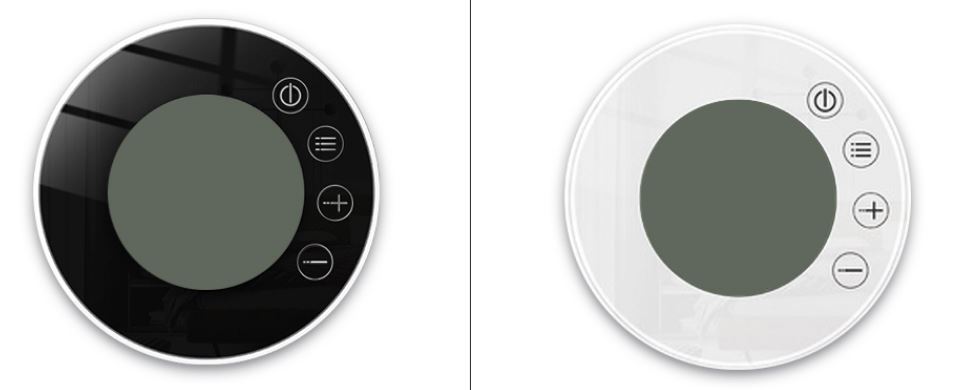
- Dual operation modes: automatic or manual – Features touch-sensitive keys and a tempered glass surface
- Backlight Adjustable brightness and on/off toggle via mobile app.
Configuration Options
- Access advanced settings by pressing andbutton simultaneously for 5 seconds while powered off.
- : Navigate through options
- Use +/- to modify values
- Exit advanced settings menu
- Temperature calibration
- Sensor selection
- Temperature limit configuration
- Hysteresis setting
- Frost protection feature
- Weekly programming and rest day selection
- Primary and secondary output mode selection
- Passive output delay adjustment
- Maximum temperature definition
- Factory reset option
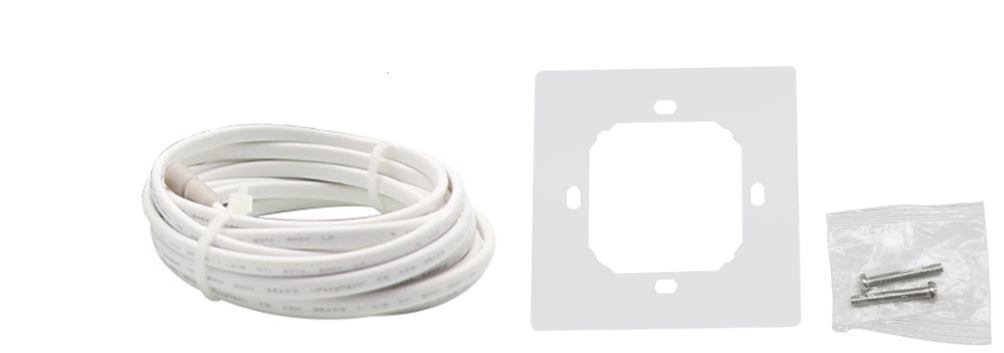
Package Contents
- Temperature and humidity controller
- One (1) sensor cable (for electric floor heating systems only)
- One sensor probe
- Mounting screws
- User manual
- Sensor cable (3m length) included only for electric floor heating applications
Product specifications
- High-Precision Temperature Regulation Temperature control accurate to 0.5°C
- Customizable Scheduling Supports 5+2 / 6+1 workweek modes with 6 distinct temperature periods daily
- Safety Lock Function Incorporates a child-proof locking mechanism
- Adjustable Hysteresis Customizable range for automatic system activation and deactivation (1-10°C)
- Operational Modes Choose between manual and automatic control settings
Smart Remote Management By installing the Graffiti Genie application, users can enable intelligent operations, allowing for remote temperature control even when away from home.
Usage Guidelines The EARU WIFI-X7GA-B Electric WiFi Thermostat enables temperature control of your HVAC system via smartphone or tablet. Follow these steps for operation:
- Thermostat Installation: Mount the device on your wall as per the user manual instructions. Ensure power to your HVAC system is off before beginning.
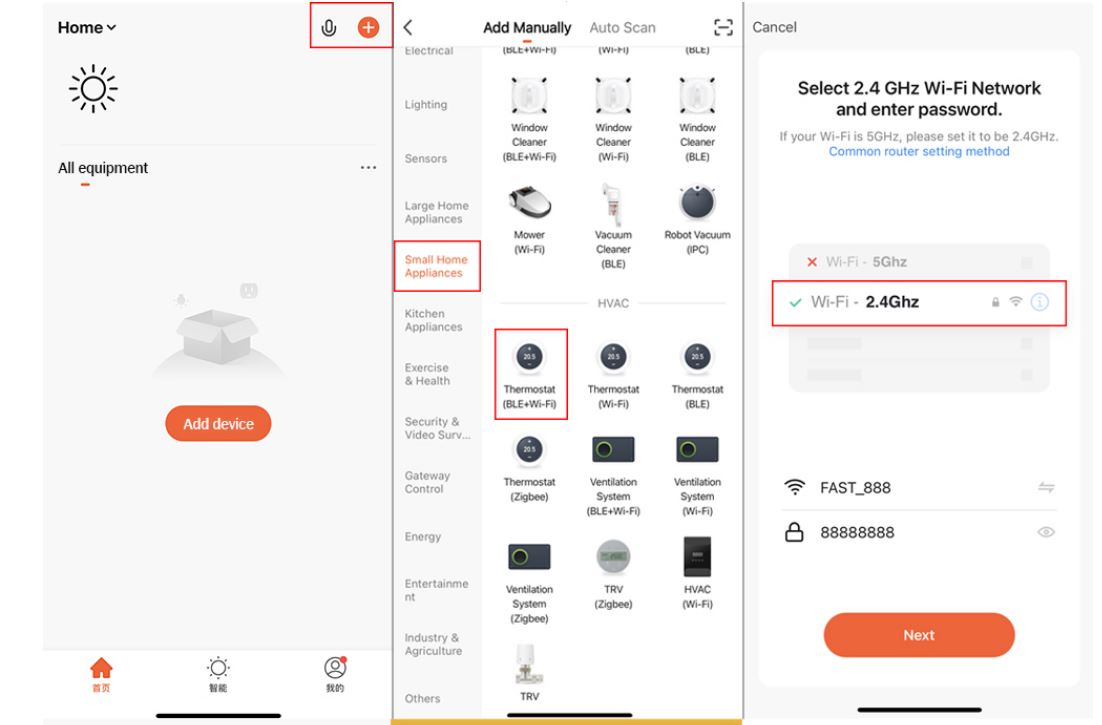
- WiFi Configuration: Download the “Smart Life” app on your mobile device. Follow the in-app instructions to create an account and add your thermostat.
- Schedule Creation: Once connected, set up a temperature schedule. Customize temperatures for different times and days, including settings for when you’re away.
- Remote Control: Use the app to manage your thermostat from any location with internet access. Adjust temperatures and toggle the system on/off remotely.
- Energy Monitoring: The thermostat tracks energy consumption and offers efficiency tips. Review your usage data in the app and make adjustments to reduce energy costs.
The EARU WIFI-X7GA-B Electric WiFi Thermostat is designed for user-friendly operation. Simply follow the setup instructions in the manual and app to start managing your HVAC system remotely.


Intelligent A1 voice control
Automatic A1 voice control voice controls free up the hands. Connect a smart speaker, free up your hands with voice control for the thermostat, and quickly update A1 smart living.
Wiring
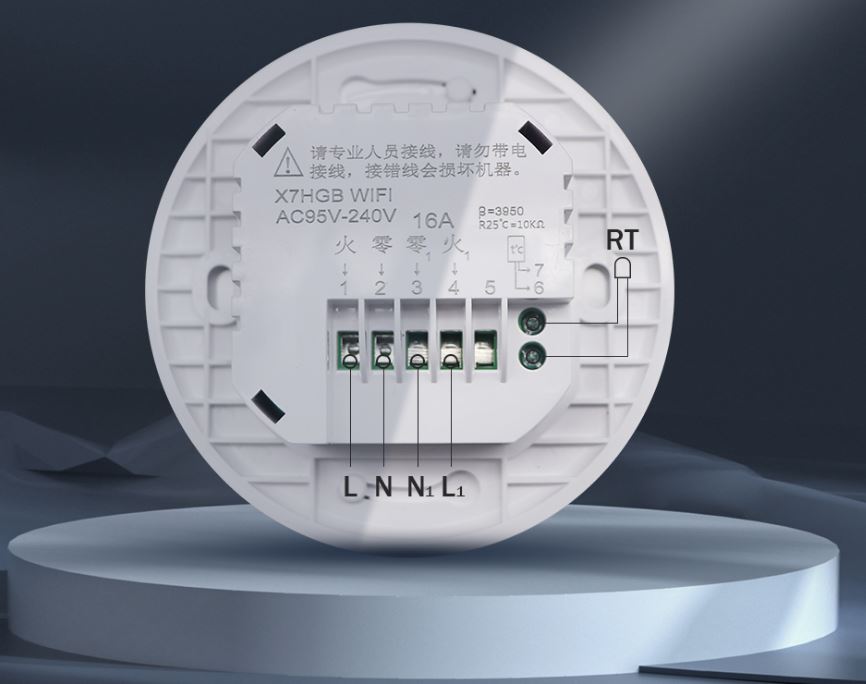
Setting the temperature controller’s wiring
The control panel’s wiring is straightforward and easy to install.
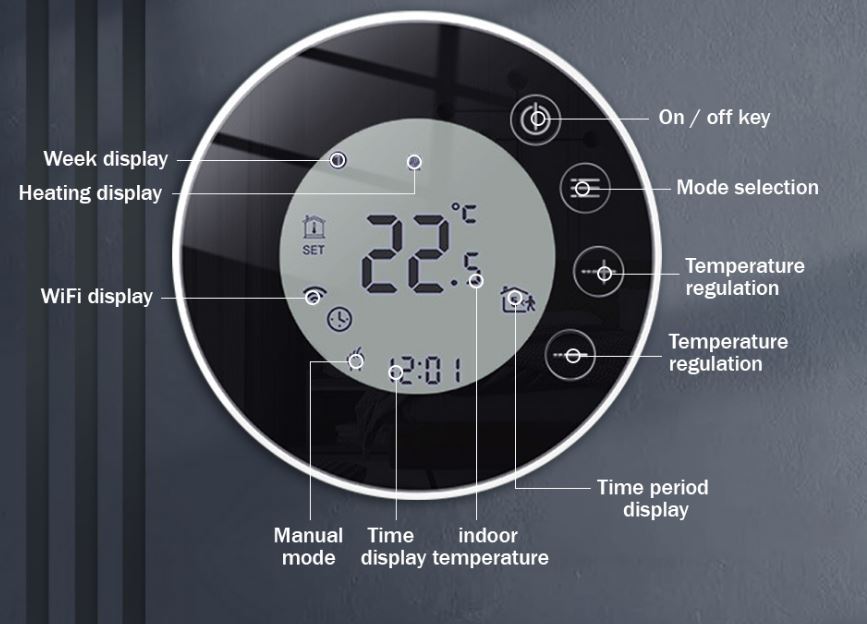
Touch function key
The operation interface has the function of setting the cooling air speed and adjusting the temperature.
Time programming description
Long press the key ![]() to enter the programming setting, short press key
to enter the programming setting, short press key![]() to switch options, press the key+or key – to adjust the parameters of options, and press a key to push out and save.
to switch options, press the key+or key – to adjust the parameters of options, and press a key to push out and save.
Two color
What’s in the box
APP
Installation Process
- Review Manufacturer Guidelines: Carefully read the detailed installation manual provided by EARU for the WIFI-X7GA-B Electric WiFi Thermostat.
- Power Down: Switch off the HVAC system’s power at the circuit breaker before starting installation.
- Remove Existing Thermostat: Carefully detach the old thermostat and disconnect its wires. Document or photograph the wiring configuration for reference.
- Mount New Thermostat: Secure the base of the new thermostat to the wall using provided hardware. Ensure it’s level and firmly attached.
- Wire Connection: Connect the HVAC system wires to the appropriate terminals on the new thermostat base, referring to your earlier notes or photos.
- Battery Installation: If required, insert batteries as per manufacturer instructions.
- WiFi Setup: Follow on-screen prompts to connect the thermostat to your WiFi network. This may involve downloading an app and creating an account.
- Functionality Test: Restore power and verify proper thermostat operation. Configure temperature settings, schedules, and other features as desired.